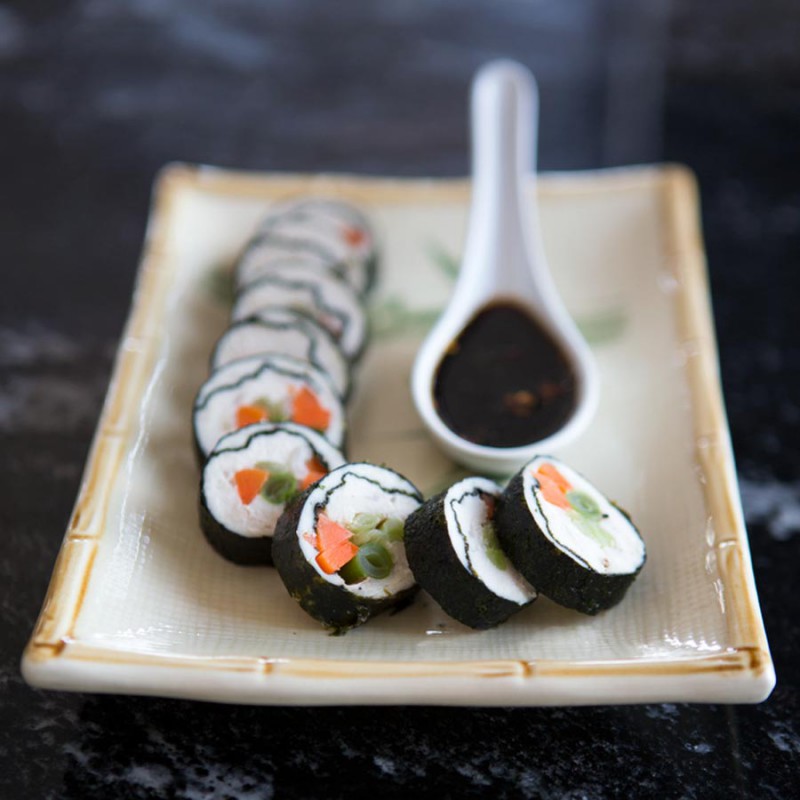
Chicken Sushi
Jackie Gordon
Appetizers & Snacks
I totally agree, raw chicken sushi would definitely be GROSS! And that’s not what I made, but I do like calling this recipe for baked nori wrapped chicken breast rolls stuffed with veggies “Chicken Sushi” because people get a very curious look on their faces when I say it. It’s definitely something unexpected. Use gluten free soy to make it and you have a gluten free and low carb appetizer. Poke a skewer in it to serve them and they become Chicken Sushi Pops and they are even more curious and delightful.

Ingredients
- 4 - 6 Nori sheets
- 1 pound of chicken breast, boneless
- 1 teaspoon kosher salt
- freshly ground black pepper
- Cooked Vegetables For Stuffing Suggestions (about 4 ounces total)asparagus, steamed and chilled
- green beans, steamed and chilled
- carrots, sliced in long strips, steamed and chilled
- red or yellow or orange pepper strips, steamed
- mushrooms, sliced and sautéed in sesame oil
- zucchini, sliced in long strips, steamed and chilled
- spinach, blanched, cooled, chopped, seasoned and squeezed
- daikon radish, sliced in long strips, steamed and chilled
- jicama, sliced in long strips, steamed and chilled
- collards, kale, swiss chard, blanched, cooled, chopped, seasoned and squeezed
- Special Equipment: sushi mat
- meat tenderizer or hammer
Directions
- Preheat oven to 350 °.
- Spray a small sheet pan with cooking spray. Set aside.
- Prepare sushi mat by wrapping it in plastic wrap.
- Prepare chicken breasts by slicing them thinly, placing them between two pieces of waxed paper or a heavy duty plastic bag and banging them out with the flat side of a meat tenderizer or meat hammer to make them flat, about 1/4” thick.
- Have your vegetables for the stuffing ready.
- Place a nori sheet lengthwise on the sushi mat with the shiny side down.
- Starting from the bottom, lay the chicken breast, evenly, on the nori leaving a 1” band of the nori uncovered on the top of the sheet. Season chicken with salt and freshly ground black pepper.
- Place contrasting colored vegetables one third up from the bottom of the nori sheet which is the side closest to you. I use three types of vegetables for each roll, making sure they extend from one side to the other with a little overhang. Don’t overstuff them.
- Being careful to keep the vegetables in place, lift the mat and roll the nori over the vegetables and squeeze the curve so it’s tight. Using the mat to guide you, roll the rest of the nori up tightly, slightly dampening the nori edge if necessary to seal it, but you may not need to because the chicken is sticky.
- Line sushi rolls on sheet pan seam side down.
- Bake for 15 - 20 minutes until the rolls are firm and cooked through.
- Cool, slice into eight pieces. Serve with Gingered Soy Sauce
Total time:
Yield: 4-6 rolls depending on how you stuffed them.
Notes
Use whatever vegetables you like for stuffing your chicken sushi. I like to use contrasting colors so it looks pretty.
I usually serve them as an appetizer, but you could also serve them as part of the salad with greens.